…so there is something about the satisfaction one feels when they pull of a DIY project. Am I right, my friends?
We know this feeling because it is what we felt when we completed these three DIY projects! Read on to discover our favourtite DIY hacks in our PLAYspace and the details on how you could make them too.
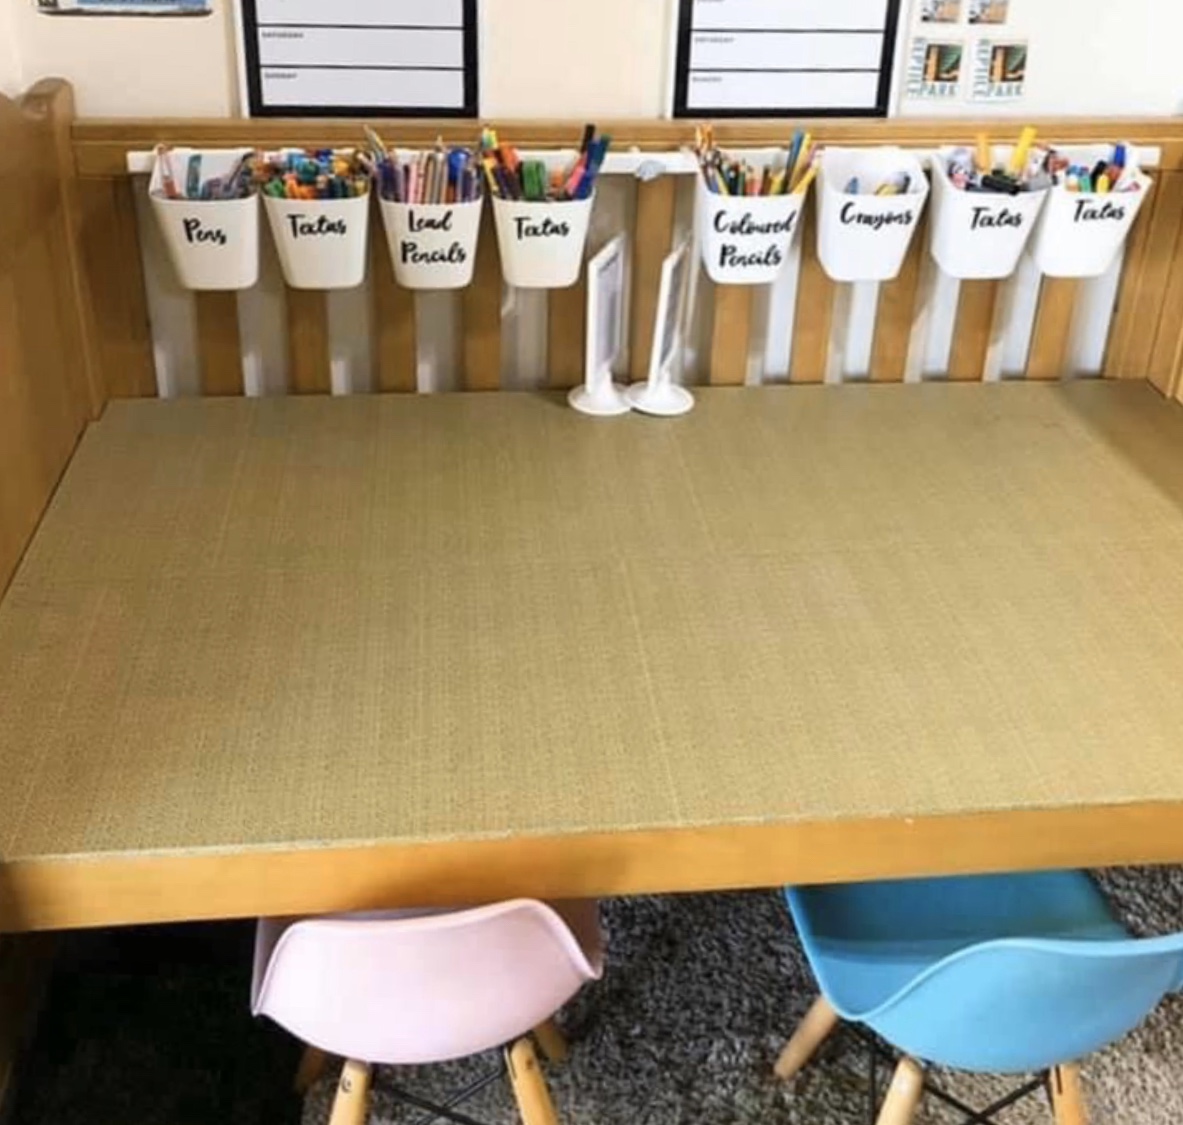
1. UPCYCLED COT TO DESK
When we were unable to find a suitable desk for our little learners and the time came to rehome our baby cot, we had a thought….a thought of what if we upcycled the cot into a deskspace.
We looked at how we could achieve this and set to work. With the removal of a side rail, the addition of a sheet of MDF cut to size, a sheet of vinyl covering and lifting the base height up…voila, we had created a deskspace.
The next addition was the SUNNERSTA rail and containers from IKEA to the remaining side rail of the cot to hold our stationery supplies. And two magazine holders for paper storage at either end for each learner.
Then, came the finishing touches with sticker labels for the Sunnersta containers and stationery supplies.
Creating this DIY has served us in so many ways:
• it has become one of the handiest spaces in our PLAY area, particularly, with the recent Home Learning journey whilst in isolation
• we have created a talking point with our family and friends
• built a versatile space that can grow with our learners and evolving family needs and
• created a family keepsake that can be passed through the generations.
Over the months, we have varied the amount of resources stored and readily available on the desk so that it best meets our needs at the time. And we have removed and replaced the vinyl wrapping for a change of design.
2. DIY STONES
We have been making a few more DIY resources for use both at home and in the classroom. We love the diversity they offer all learners as a finished product but moreso the practical learning experience that comes through the process of making. One of our most favourite to date has to be the DIY stone sets available from Stay Classy Classrooms.
HOW WE MAKE DIY STONES
a) We find the images and print them.
b) We then cut the images out and then glue them onto a sets of white pebbles using ModPodge.
FYI – The gluing process requires a two step process…glue the paper cut out onto the stone and then paint another layer over the image. We ensure the layer is even and well coated.
We use pebbles from Bunnings…they are the Tuscan Path decorative pebbles and ModPodge from Spotlight.
c) Leave to dry on sheets of baking paper.
3. daily PLAY Planner
This organisational tool has been a part of our daily life for 3 years now. It is something we created and use every day to help us nurture the FLOW of play and learning in our home alongside with the running of a household, teaching in a classroom, building a business and engaging in family commitments.
We created this to bring greater intention each day and ultimately cultivate a legacy of PLAY for our little learners and share this passion with YOU, our fellow PLAYmates…this is our deep why for what we do.
How our daily PLAY planner works for us:
• We first fill in the day and date along with any scheduled appointments for the day – the events that must be done at a specific time. We record this under the To Do List (lines located to the right of the planner page).
• Then we fill in the PLAY sections for each day of the week (Fri-Thurs) eg. Toy Rotation, PBLS and Daily Activity Tubs. These activities are based on our daily routine & schedule, learners’ interests, skills and are flexible to change as we never quite know where each day will take us.
• Then we fill in our Top Priorites – we have four of these for each day. These are the four tasks I really want to complete on any set day. They are the non-negotiable kind of tasks.
• We then fill in the breakfast, lunch, dinner and snacks section.
• Next, we fill in the shopping/gift ideas, self care sections. The shopping/gift ideas section is used for grocery items I think of and need to write down quickly (later added to our regular grocery list), play resources and gifts needed to be purchased. The gift ideas are for our family members…when we think of a suitable idea perhaps after talking to them or when our learners have mentioned something they like or would want.
• The PLAY IDEAS section is filled out as we have an idea that our learners would love to engage in.
• Each day we tick off the Household Duties and Daily 5 am/Daily 5 pm as they are completed.
• The calls/records section is where we record any important phonecall details, receipt numbers etc.
• The water droplets are coloured in as we consume water.
Please let us know in the comments what your favourite DIY hacks in your PLAYspace are – we’d love to hear.
Happy Playing!!
Erin xx